Slow Cooker Recipes: Easy Meals, Less Effort!
Family-friendly dishes for busy people — quick prep, delicious results.
Grab yours for $4Craving something sweet but short on time?
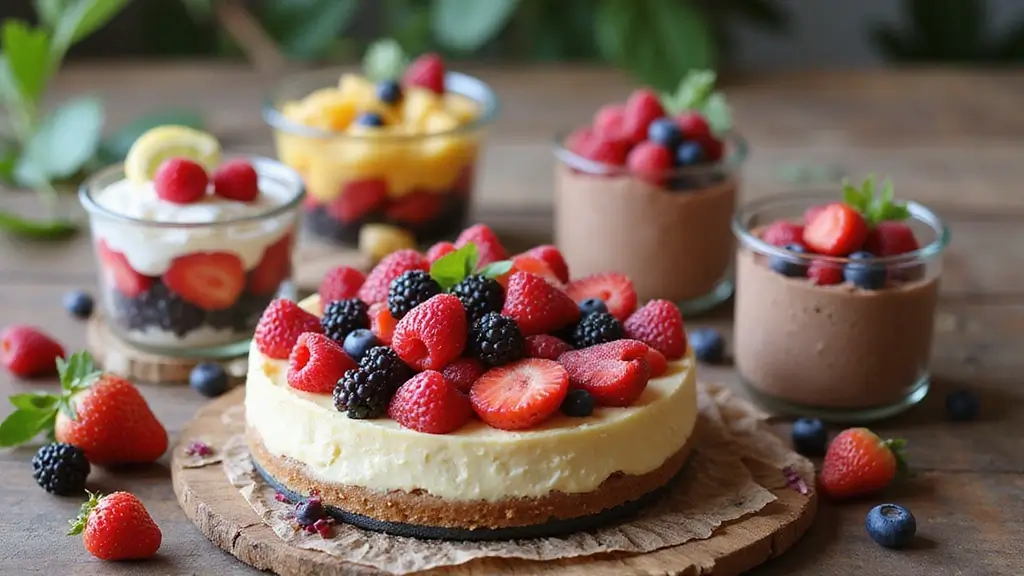
These no-bake dessert recipes are a lifesaver for busy schedules, giving you scrumptious options without the hassle of an oven.
From creamy cheesecakes to chocolatey delights, each treat is designed to satisfy your sweet tooth with minimal effort.
Let’s dive into these quick treats that are perfect for kids and adults alike, making dessert a delightful occasion every time!
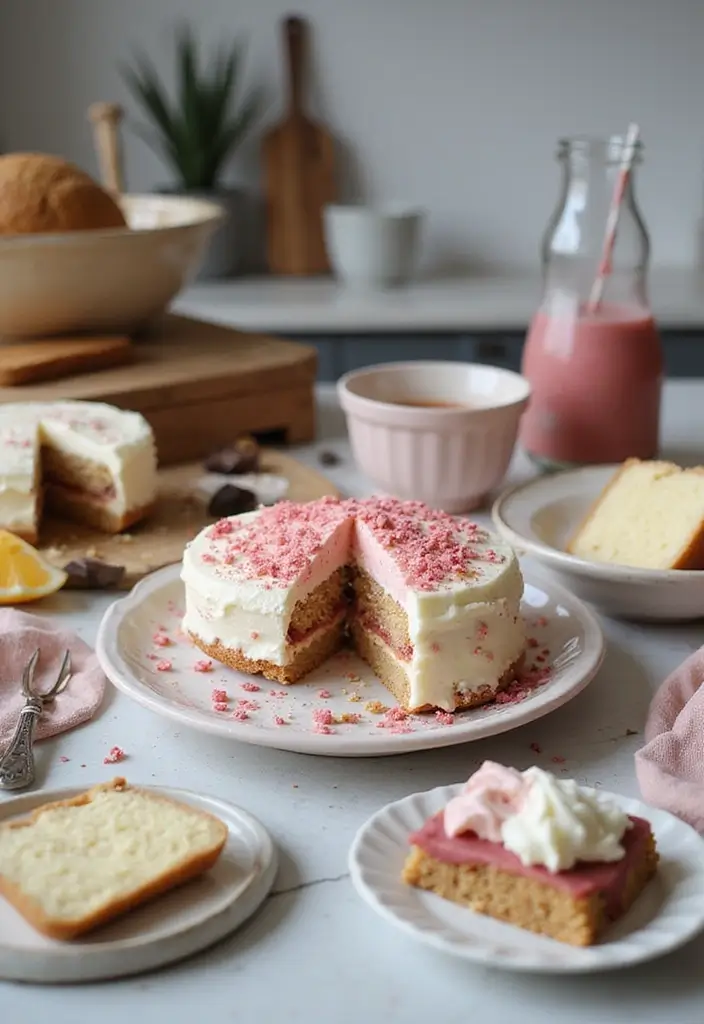
1. No-Bake Chocolate Cheesecake
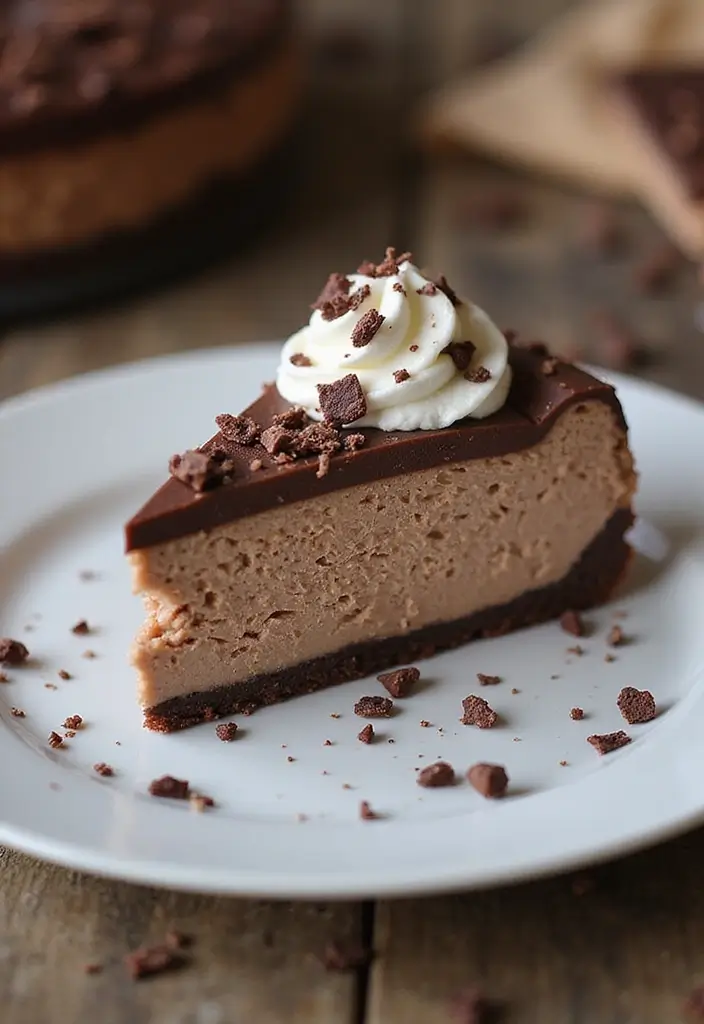
Decadent and rich, a no-bake chocolate cheesecake is the perfect indulgence.
With a smooth chocolate filling nestled on a crunchy cookie crust, this treat is sure to impress your guests or satisfy a late-night craving.
You can whip it up in no time, making it ideal for those moments when you need something special without the fuss of baking.
Serve it chilled and garnish with chocolate shavings or whipped cream for an elegant touch.
Recipe Overview:
– Servings: 8
– Prep Time: 30 minutes
– Cook Time: 0 minutes
– Total Time: 30 minutes
– Calories: 350 per slice
Nutrition Information:
– Total Fat: 24g
– Saturated Fat: 14g
– Carbohydrates: 30g
– Sugar: 20g
– Protein: 5g
Ingredients:
– 1 ½ cups crushed chocolate cookies
– ½ cup unsalted butter, melted
– 2 (8 oz) packages cream cheese, softened
– 1 cup powdered sugar
– 1 cup heavy whipping cream
– 1 cup semi-sweet chocolate chips, melted
Instructions:
1. Combine crushed cookies and melted butter and press into the bottom of a springform pan.
2. In a bowl, beat cream cheese and powdered sugar until smooth.
3. Fold in whipped cream.
4. Stir in melted chocolate until well-combined.
5. Pour filling over the crust and smooth the top.
6. Refrigerate for at least 4 hours before serving.
– Use a good quality chocolate for the best flavor.
– For added richness, top with chocolate ganache before serving.
Frequently Asked Questions:
– Can I make this ahead of time? Yes, it keeps well in the fridge for up to 3 days.
– Can I use a different type of cookie? Absolutely! Experiment with your favorite cookie crust.


2. Fruit & Yogurt Parfait
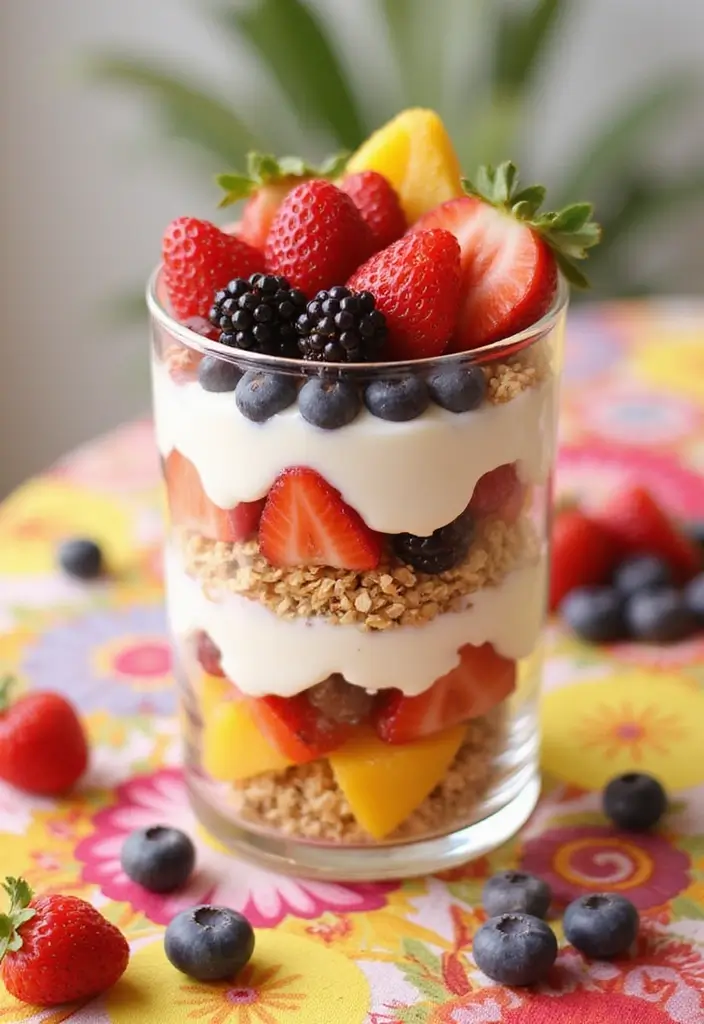
Brighten your day with a refreshing fruit and yogurt parfait!
Layered with creamy yogurt, vibrant fruits, and crunchy granola, this dish is not just visually appealing but also packed with nutrients.
It’s a versatile sweet treat that can easily cater to breakfast or dessert cravings.
You can customize it based on seasonal fruits or add your favorite toppings like nuts or honey.
Recipe Overview:
– Servings: 4
– Prep Time: 10 minutes
– Cook Time: 0 minutes
– Total Time: 10 minutes
– Calories: 150 per serving
Nutrition Information:
– Total Fat: 6g
– Saturated Fat: 2g
– Carbohydrates: 22g
– Sugar: 12g
– Protein: 8g
Ingredients:
– 2 cups yogurt (Greek or regular)
– 2 cups mixed berries (strawberries, blueberries, raspberries)
– 1 cup granola
– Honey or maple syrup, to taste
Instructions:
1. In a glass or cup, layer yogurt at the bottom.
2. Add a layer of mixed berries.
3. Sprinkle a layer of granola.
4. Repeat the layers until you reach the top.
5. Drizzle honey or maple syrup on top and serve immediately.
– Use a mix of textures for a more exciting parfait.
– Serve within 30 minutes of assembling for the best crunch in the granola.
Frequently Asked Questions:
– Can I use frozen fruit? Yes, just let it thaw a little before layering.
– How can I make it vegan? Substitute yogurt with a plant-based version.
Elevate your snack game with a fruit & yogurt parfait! In just 10 minutes, you can whip up a vibrant, nutritious treat that satisfies both breakfast and dessert cravings. Customize it to your taste and enjoy the delicious layers of goodness!


3. Chilled Chocolate Mousse Cups

Light, airy, and oh-so-chocolatey, chilled chocolate mousse cups are a delightful treat to beat the heat. Perfectly portioned in individual cups, they are not just easy to make, but also bring a fancy touch to any gathering. The best part? They come together with just a few ingredients, making them an all-time favorite among busy bakers.
To get started, having the right tools on hand can make the process even smoother. A microwave-safe mixing bowl set is essential for melting your chocolate chips effortlessly. Simply place them in the bowl, microwave until smooth, and you’ll avoid any messy cleanup.
Once your chocolate is ready, you can whip the cream using an electric hand mixer. This handy tool not only makes whipping the cream to soft peaks a breeze but also helps you achieve the perfect stiffness in your egg whites—crucial for that light, airy texture in your mousse.
Dollop with whipped cream and sprinkle with cocoa for the ultimate finish!
Recipe Overview:
– Servings: 6
– Prep Time: 15 minutes
– Cook Time: 0 minutes
– Total Time: 15 minutes
– Calories: 250 per cup
Nutrition Information:
– Total Fat: 19g
– Saturated Fat: 10g
– Carbohydrates: 23g
– Sugar: 15g
– Protein: 4g
Ingredients:
– 1 cup heavy cream
– 1 cup semi-sweet chocolate chips
– 3 large egg whites
– 1/4 cup granulated sugar
Instructions:
1. Melt chocolate chips in a microwave-safe bowl until smooth, letting it cool slightly.
2. In a separate bowl, whip cream until soft peaks form.
3. In another bowl, beat egg whites until foamy, then gradually add sugar, beating until stiff peaks form.
4. Fold melted chocolate into whipped cream, then gently fold in egg whites until no streaks remain.
5. Spoon mousse into individual cups and chill for at least 2 hours before serving.
– Ensure chocolate is cool before adding to whipped mixture for the best texture.
– For added flair, top with shaved chocolate or fresh berries.
Frequently Asked Questions:
– Can I substitute egg whites? Yes, whipped cream can be a great alternative.
– How long can I store this? Keep in the fridge for up to 3 days.


4. No-Bake Peanut Butter Bars
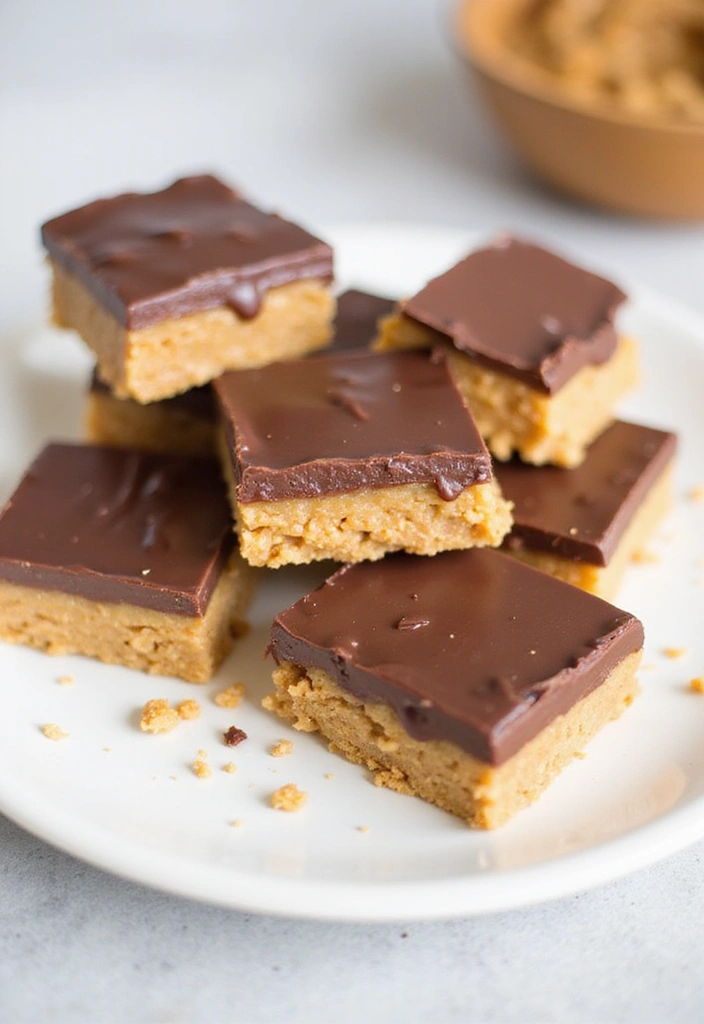
For peanut butter lovers, these no-bake bars are a dream come true! With a crunchy base and a creamy, nutty top, they make for an excellent sweet snack. These bars come together effortlessly and can be stored for days, making them a convenient option for hectic weeks. Cut them into squares for a fun treat that kids will adore.
To make the process even easier, consider using an 8×8 inch baking pan for pressing down your mixture. This nonstick steel pan ensures that your bars come out easily, allowing you to enjoy your treats without the hassle of stubborn stuck-on layers.
Recipe Overview:
– Servings: 12
– Prep Time: 15 minutes
– Cook Time: 0 minutes
– Total Time: 15 minutes
– Calories: 200 per bar
Nutrition Information:
– Total Fat: 14g
– Saturated Fat: 3g
– Carbohydrates: 18g
– Sugar: 10g
– Protein: 5g
Ingredients:
– 1 cup graham cracker crumbs
– 1 cup powdered sugar
– 1 cup peanut butter
– 1/2 cup melted chocolate chips
Instructions:
1. In a mixing bowl, combine graham cracker crumbs, powdered sugar, and peanut butter until well mixed.
2. Press mixture into a lined 8×8 inch pan evenly.
3. Melt chocolate chips and spread over the top of the peanut butter layer.
4. Refrigerate for at least 1 hour before cutting into squares.
– For a crunchy texture, mix in chopped peanuts or rice puff cereal.
– Store in the fridge to keep bars firm and fresh.
Frequently Asked Questions:
– Can I use almond butter? Yes, almond butter works well in this recipe.
– How long do these last? They can be stored in an airtight container for about a week.


5. S’mores Dip
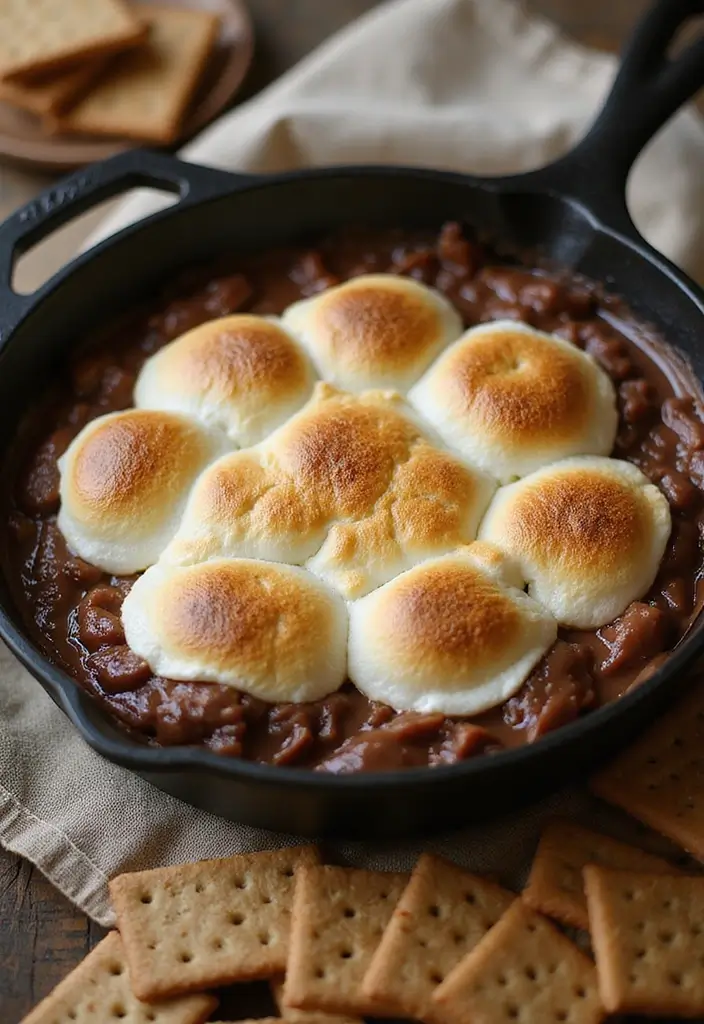
Bring the campfire experience indoors with this delicious s’mores dip! This gooey, sweet treat is made for sharing and perfect for family movie nights. Set it up as an interactive dessert where everyone can dip their favorite snacks, from graham crackers to pretzels. It’s quick to put together and even quicker to disappear!
For this recipe, you’ll need a reliable skillet like the OXO Enhanced, 12″ frying pan skillet with lid. This cast iron skillet is perfect for baking your s’mores dip evenly, ensuring that the chocolate and marshmallows melt to perfection. Plus, it’s oven-safe and dishwasher safe, making cleanup a breeze.
Here’s a quick overview of the recipe:
– Servings: 8
– Prep Time: 10 minutes
– Cook Time: 10 minutes
– Total Time: 20 minutes
– Calories: 250 per serving
Nutrition Information:
– Total Fat: 10g
– Saturated Fat: 5g
– Carbohydrates: 36g
– Sugar: 22g
– Protein: 2g
**Ingredients:**
– 1 cup mini semi-sweet chocolate chips
– 1 cup mini marshmallows
– 1 tablespoon butter
– Graham crackers or snacks for dipping
**Instructions:**
1. Preheat oven to 350°F (175°C).
2. In a cast-iron skillet or oven-safe dish, layer chocolate chips and top with mini marshmallows.
3. Melt butter and drizzle over the top.
4. Bake for about 10 minutes until marshmallows are golden and chocolate is melted.
5. Serve warm with graham crackers for dipping.
– Add a sprinkle of sea salt on top for a flavor contrast.
– Use milk chocolate or dark chocolate for varying sweetness.
**Frequently Asked Questions:**
– Can I make this ahead of time? It’s best enjoyed fresh from the oven.
– Any alternatives for dipping? Pretzel sticks or fruit slices work beautifully.
With the right tools and ingredients, you can create this quick, delightful dessert that the whole family will love!
You might also like


6. Coconut Energy Balls
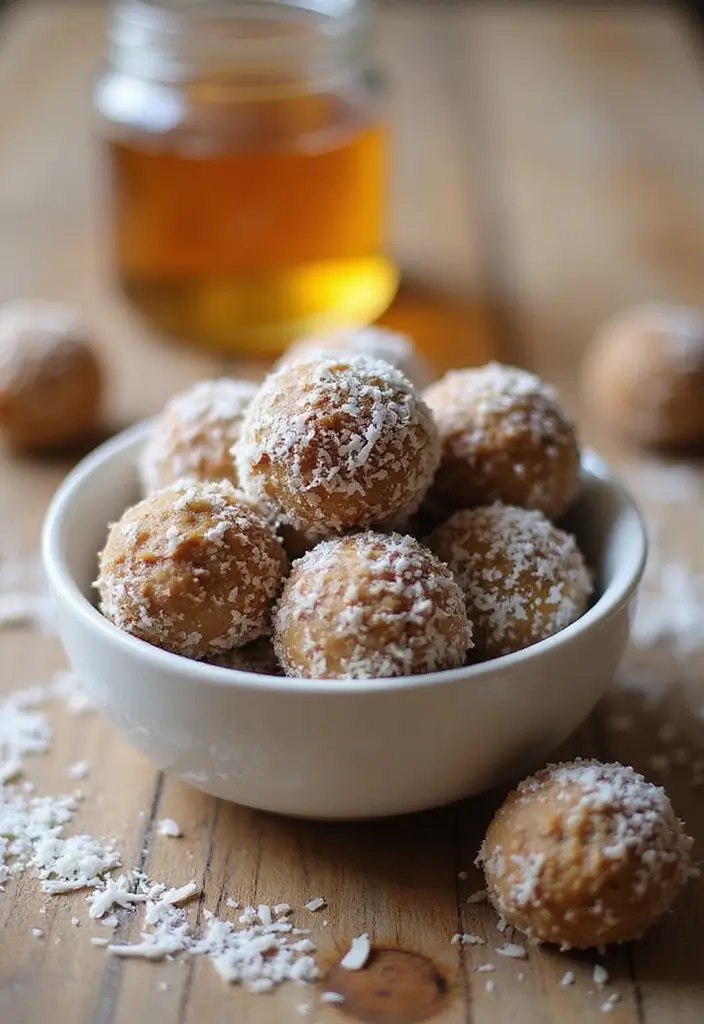
### 6. Coconut Energy Balls
Need a quick energy boost?
These no-bake coconut energy balls are simply delightful and packed with nutrition! Utilizing high-quality ingredients like Quaker Old Fashioned Rolled Oats, they’re perfect for a mid-day snack or a sweet post-workout treat. Rolled oats are a great source of fiber, helping to keep you full and energized throughout your busy day.
With the creamy texture of MaraNatha Organic Creamy Peanut Butter, these energy balls not only taste amazing but also provide healthy fats and protein. Plus, kids love them, making them an ideal quick treat to keep their energy levels up.
For a touch of sweetness, we use honey along with 365 by Whole Foods Market Organic Shredded Coconut, which adds a tropical flavor and a hint of chewiness, packed with nutrients. You can even throw in some chocolate chips for a little extra indulgence.
**Recipe Overview:**
– Servings: 12
– Prep Time: 15 minutes
– Cook Time: 0 minutes
– Total Time: 15 minutes
– Calories: 120 per ball
**Nutrition Information:**
– Total Fat: 7g
– Saturated Fat: 4g
– Carbohydrates: 10g
– Sugar: 5g
– Protein: 3g
**Ingredients:**
– 1 cup rolled oats
– 1/2 cup peanut butter
– 1/4 cup honey
– 1/2 cup shredded coconut
– 1/4 cup chocolate chips (optional)
**Instructions:**
1. Combine all ingredients in a bowl, mixing until well combined.
2. Roll the mixture into small balls, about 1 inch in size.
3. Place them on a baking sheet lined with parchment paper.
4. Refrigerate for at least 30 minutes to firm up before enjoying.
– Feel free to swap nuts or seeds for a different flavor.
– Store in an airtight container in the fridge for up to a week.
**Frequently Asked Questions:**
– Can I use a different nut butter? Absolutely! Almond or cashew butter works great.
– Is it okay to add protein powder? Yes, you can incorporate a scoop for an extra boost.
Fuel your day with a bite of joy! These no-bake coconut energy balls are a quick and tasty way to keep your energy up – perfect for busy schedules and little hands!


7. No-Bake Lemon Cheesecake Jars
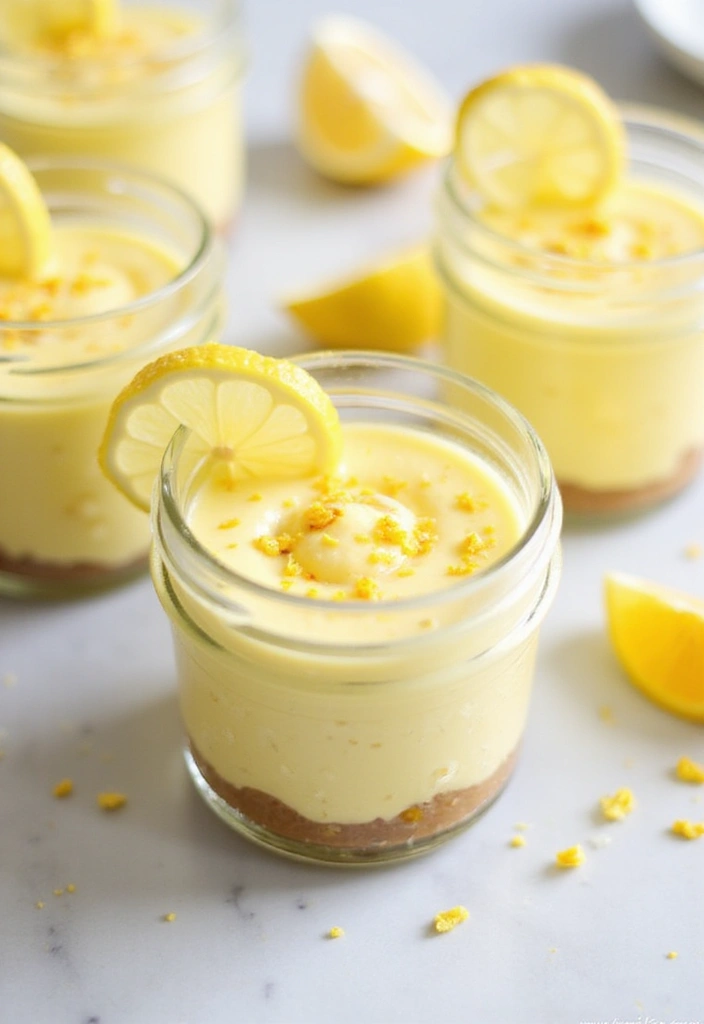
Brighten up your dessert table with no-bake lemon cheesecake jars! These little beauties are creamy, zesty, and oh-so-refreshing, perfect for warm days. Layered in individual jars, they are easy to serve and even easier to eat. This dessert is great for parties or just a sweet treat at home.
To make your preparation even smoother, consider using an electric hand mixer. This handy tool makes beating the cream cheese and powdered sugar a breeze, ensuring a smooth and fluffy filling for your cheesecake jars. Plus, its compact design and snap-on storage case make it easy to store away after you’re done.
Recipe Overview:
– Servings: 6
– Prep Time: 20 minutes
– Cook Time: 0 minutes
– Total Time: 20 minutes
– Calories: 210 per jar
Nutrition Information:
– Total Fat: 12g
– Saturated Fat: 6g
– Carbohydrates: 22g
– Sugar: 14g
– Protein: 4g
Ingredients:
– 1 ½ cups crushed graham crackers
– 3 tablespoons sugar
– 1/2 cup unsalted butter, melted
– 2 (8 oz) packages cream cheese, softened
– 1 cup powdered sugar
– 1 cup lemon curd
– 1 cup whipped cream
Instructions:
1. Combine crushed graham crackers, sugar, and melted butter. Divide the mixture into jars as the base layer.
2. In a bowl, use your electric hand mixer to beat cream cheese and powdered sugar until smooth.
3. Fold in lemon curd and whipped cream.
4. Layer the lemon mixture over the crust in each jar.
5. Chill for at least 2 hours before serving.
For that extra touch of zest, a lemon zester will come in handy for garnishing with lemon zest or slices. With its razor-sharp stainless steel blade, it makes zesting quick and effortless, elevating the presentation of your dessert.
– Use store-bought lemon curd for convenience.
Frequently Asked Questions:
– Can I use lime instead? Yes, lime curd can be substituted for a twist.
– How long can these be stored? Enjoy within 3 days for the best quality.
When the heat is on, refresh your day with a no-bake lemon cheesecake jar! Easy dessert recipes like this bring sweet joy in just 20 minutes—perfect for any occasion!

8. Banana Pudding Cups
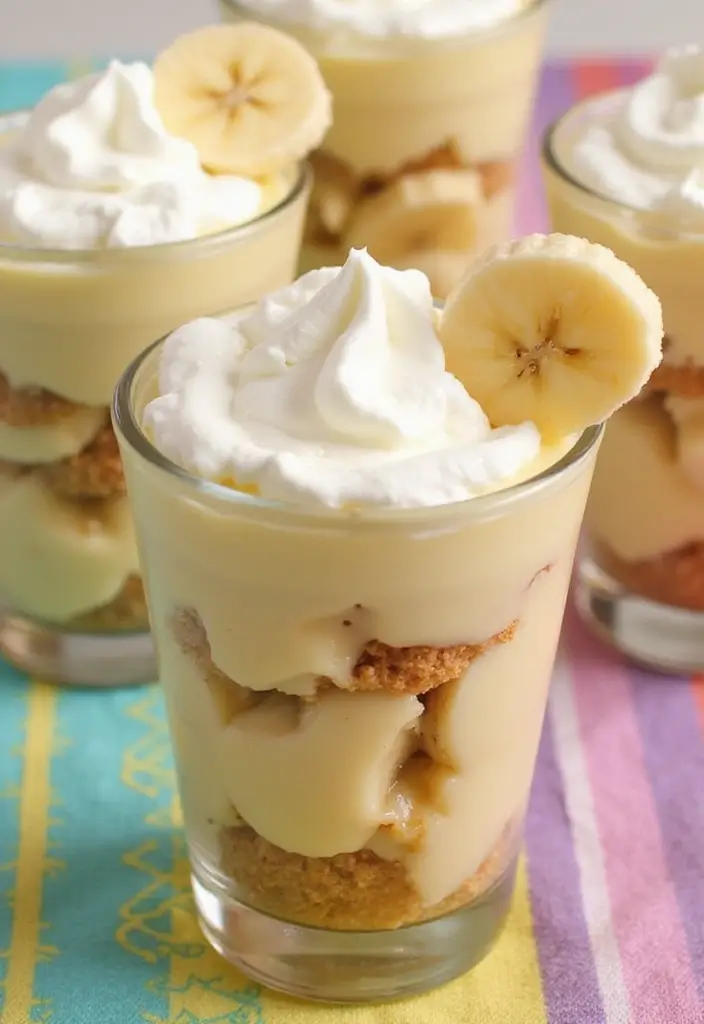
Classic banana pudding gets a fun twist with these adorable pudding cups!
Stacked with layers of creamy pudding, banana slices, and crunchy vanilla wafers, they are bound to bring back childhood memories.
They are incredibly easy to prepare, and kids can help with the layering process!
Perfect for parties or simply as a sweet treat at home.
Recipe Overview:
– Servings: 6
– Prep Time: 15 minutes
– Cook Time: 0 minutes
– Total Time: 15 minutes
– Calories: 180 per cup
Nutrition Information:
– Total Fat: 5g
– Saturated Fat: 2g
– Carbohydrates: 30g
– Sugar: 15g
– Protein: 3g
Ingredients:
– 2 cups vanilla pudding
– 3 large bananas, sliced
– 1 cup whipped cream
– 1 cup vanilla wafers, crushed
Instructions:
1. In a cup, add a layer of vanilla pudding.
2. Top with a layer of sliced bananas and crushed wafers.
3. Repeat the layers until cups are full.
4. Top with whipped cream and a few banana slices for garnish.
– Assemble shortly before serving to keep the wafers crunchy.
– Use ripe, firm bananas for the best flavor.
Frequently Asked Questions:
– Can I make this ahead of time? Yes, but the wafers may get soggy.
– Can I substitute with chocolate pudding? Absolutely, for a fun chocolate twist!


9. Chocolate Dipped Strawberries

Simple yet elegant, chocolate-dipped strawberries are always a crowd-pleaser! They are ideal for celebrations or just as a sweet snack. The combination of fresh fruit and rich chocolate makes for a delightful treat that’s easy to prepare. Anyone can make these, and they look stunning on any platter.
To get started, you’ll need a microwave-safe bowl for melting the chocolate. A great option is the Microwave-Safe Bowl Set. This versatile set is perfect for prepping and will withstand the heat, making your chocolate melting process straightforward and mess-free.
**Recipe Overview:**
– Servings: 12
– Prep Time: 10 minutes
– Cook Time: 5 minutes
– Total Time: 15 minutes
– Calories: 70 per strawberry
**Nutrition Information:**
– Total Fat: 4g
– Saturated Fat: 2g
– Carbohydrates: 8g
– Sugar: 6g
– Protein: 1g
**Ingredients:**
– 1 pound strawberries, fresh and washed
– 8 oz semi-sweet chocolate chips
– 1 tablespoon coconut oil (optional)
**Instructions:**
1. Melt chocolate chips in a microwave-safe bowl, stirring every 30 seconds until smooth.
2. Stir in coconut oil for a shinier finish, if desired.
3. Dip strawberries into melted chocolate and let excess drip off.
4. Place dipped strawberries on parchment paper and refrigerate to set.
For an easier dipping experience, consider the Chocolate Melting Pot. It’s perfect for melting chocolate and allows for easy drizzling and decorating, making your strawberries even more delightful.
For a fun twist, drizzle white chocolate over the dark chocolate coating. Serve with a side of whipped cream for an extra indulgent experience.
**Frequently Asked Questions:**
– How long will they last? Best enjoyed within 24 hours after making.
– Can I use milk chocolate? Yes, feel free to use your favorite chocolate.
Indulge in the magic of chocolate-dipped strawberries! Just 15 minutes to transform fresh fruit into a stunning dessert that’s sure to impress. Who knew elegance could be this easy?


10. Rice Krispie Treats
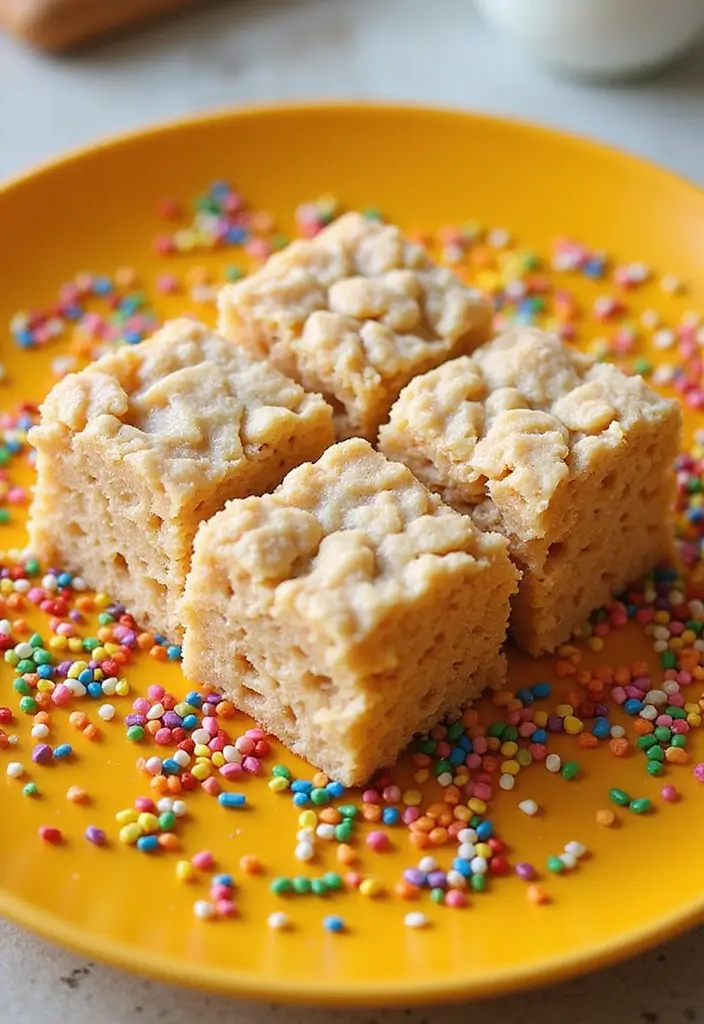
### 10. Rice Krispie Treats
A classic favorite that’s super easy to whip up, rice krispie treats are a nostalgic dessert for many. With just three ingredients, these chewy, crunchy bars are perfect for any occasion. They’re quick to make, fun to shape, and a fantastic treat for kids to help with! Dress them up with sprinkles or dip in chocolate for a fun twist.
For your rice krispie treats, using Rice Chex gluten free breakfast cereal is a great option if you’re looking for a gluten-free alternative to traditional rice cereal. This versatile cereal not only works well in treats but can also be used for making homemade Chex mix, giving you more culinary flexibility.
To simplify the cleanup process when making your treats, consider using a silicone baking mat. This non-stick reusable mat makes it easy to press your treat mixture into the pan without sticking and helps keep your baking surface tidy.
#### Recipe Overview:
– Servings: 12
– Prep Time: 10 minutes
– Cook Time: 5 minutes
– Total Time: 15 minutes
– Calories: 90 per square
#### Nutrition Information:
– Total Fat: 2g
– Saturated Fat: 1g
– Carbohydrates: 16g
– Sugar: 7g
– Protein: 1g
#### Ingredients:
– 6 cups rice cereal
– 1 package (10 oz) marshmallows
– 3 tablespoons butter
#### Instructions:
1. In a large pot, melt butter over low heat.
2. Add marshmallows, stirring until completely melted.
3. Remove from heat and stir in rice cereal until coated.
4. Press mixture into a greased pan lined with your silicone baking mat and let it cool.
5. Cut into squares and serve.
– For added flavor, mix in chocolate chips or peanut butter.
– Store in an airtight container to keep them soft.
#### Frequently Asked Questions:
– Can I make these ahead of time? Yes, they keep well for several days.
– Can I use a different cereal? Certainly! Feel free to experiment with your favorite puffs or flakes.


Conclusion
Whether it’s for a special occasion or just to satisfy a sudden craving, these no-bake dessert recipes offer quick solutions that are both simple and scrumptious.
Perfect for busy days or when you’re looking to whip up something sweet without the fuss of baking, these treats are sure to become favorites.
Dive into these easy dessert recipes today and enjoy the deliciousness they bring!
Note: We aim to provide accurate product links, but some may occasionally expire or become unavailable. If this happens, please search directly on Amazon for the product or a suitable alternative.
This post contains Amazon affiliate links, meaning I may earn a small commission if you purchase through my links, at no extra cost to you.
Frequently Asked Questions
What are some quick dessert ideas that don’t require baking?
If you’re short on time but craving something sweet, no-bake desserts are your best friend! Try a No-Bake Chocolate Cheesecake for a rich treat, or opt for a Fruit & Yogurt Parfait for a refreshing and healthy option.
Other easy dessert recipes include Chilled Chocolate Mousse Cups and No-Bake Peanut Butter Bars—both are quick to prepare and delicious!
How can I make no-bake desserts more appealing for kids?
Getting kids excited about no-bake desserts can be fun! Let them help with the preparation, like layering ingredients in Banana Pudding Cups or decorating Chocolate Dipped Strawberries.
Interactive desserts like S’mores Dip can also engage them, as they can customize their treats. Involving kids in the process makes for a memorable experience and a sweeter treat!
Are there any easy baking recipes included in no-bake desserts?
While no-bake desserts are all about ease and convenience, some recipes do incorporate simple baking techniques. However, the focus here is on easy dessert recipes that don’t require an oven.
If you’re looking for quick treats that involve minimal baking, consider making Rice Krispie Treats—they are super easy and just require melting and mixing ingredients!
Can I customize the ingredients in these no-bake dessert recipes?
Absolutely! One of the great things about easy dessert recipes is the flexibility they offer. You can swap out ingredients to cater to dietary needs or personal tastes.
For instance, try using different fruits in your Fruit & Yogurt Parfait, or substitute almond butter for peanut butter in No-Bake Peanut Butter Bars. Feel free to get creative with flavors and textures!
How long do no-bake desserts typically take to prepare?
No-bake desserts are designed for simplicity and speed! Most recipes can be prepared in under 30 minutes.
For example, Coconut Energy Balls can be mixed and rolled in no time, while No-Bake Lemon Cheesecake Jars require just a bit of layering before chilling. Perfect for busy schedules, you’ll satisfy your sweet cravings in a flash!